Beef Short Ribs Recipe Brisket Style
Beef short ribs are one of my very favorite cuts to cook on the BBQ and are every bit as good as they look!
Somewhat brisket-like in taste, every bit as flavorful, moist and melt in your mouth, yet only taking 7 and 10 hours to cook instead of 16 or more for a full brisket.
Smoked beef ribs cooked correctly are moist, tender, incredibly beefy, have an intense smoky and spicy bark with melt in your mouth meat, and have a significant wow factor that is sure to impress your guests.
So how do you smoke beef ribs? This article is the recipe and method for how I do them.
Contents (Jump to Topic)
- 1 What are Beef Short Ribs?
- 2 Ingredients and Equipment Needed
- 3 What to Look For When Buying Beef Ribs
- 4 Preparing Your Smoker
- 5 Preparing the Ribs
- 6 Remove the Membrane — or Not?
- 6.1 I Remove the Membrane — Here's How
- 7 Making the Rub
- 8 Coat the Ribs in Mustard
- 9 Apply Dry Rub
- 10 Add Your Ribs to The Smoker
- 11 Smoke for 4 Hours, Then Wrap With Liquid
- 12 Wrap or Not? How to Decide? It Depends on Marbling
- 13 Cook To Tenderness, Not temp
- 14 When Done, Remove, Wrap and Rest
- 15 Slice Into Individual Ribs and Serve
- 16 Add Sauce if You Wish
- 17 Printable Recipe Card
- 18 Smoked Beef Ribs Recipe — BIG, Rich, Moist and Tender Short Ribs
- 18.1 Description
- 18.2 Ingredients
- 18.3 Instructions
- 18.4 Notes
- 18.5 Did you make this recipe?
What are Beef Short Ribs?
Beef short ribs are the huge, dinosaur bone-like, sometimes foot long ribs from a cow that BBQ pitmasters fantasize about.
They can weigh as much as 2.5 pounds each, but 1 to 1.5 pounds each is more the norm. You find them in all the best BBQ joints across Texas, and their popularity has been slowly making its way across the BBQ world for the last few years.
Pretty much always sold in joints of 3 to 4, and also known as 'short plate ribs,' they are the largest and meatiest of all ribs, either beef or pork, that you can possibly buy.
You can buy them individually, but they are better bought in plates of up to 4 ribs.
Ingredients and Equipment Needed
To follow my cook, you will need the following ingredients:
- Two plates of 4 x short ribs each
- 2x tbsp French's yellow mustard
- 60g Black Peppercorns
- 20g Kosher Salt or Sea Salt
- Tbsp garlic powder
- Tbsp smoked paprika
- Tsp cayenne pepper (optional)
You will also need:
- A smoker
- Two aluminum trays
- Aluminum foil
- Braising liquid (I simply use beer — but beer, stout or beef stock will suffice!)
What to Look For When Buying Beef Ribs
First, there are different types of beef ribs. Make sure you buy short ribs, not back ribs.
Back ribs come from near the prime rib, so butchers try to keep most of the meat on that cut instead, leaving very little to remain on the back ribs. In fact, often the only meat on back ribs is the meat between the bones. This is not what we're after!
Secondly, within the name 'short ribs', there are two sub-types: Plate short ribs, and chuck short ribs. Either of these are what we want!
The chuck short ribs come from closer to the shoulder, tend to be slightly smaller and have more connective tissue.
The plate short ribs are longer and larger have a higher 'meat to connective tissue' ratio, and once cooked are slightly more lean and tender than chuck short ribs.
For the purpose of smoking, I've always found cooking them as pairs or higher is best, not cooking them as individual ribs, then separating into single ribs after cooking. So buy a plate of 2, 3 or 4 ribs, depending on your needs.
Finally, you want to buy beef ribs with a good amount of marbling, as intramuscular fat is what keeps them moist during cooking and is responsible for a ton of flavor.
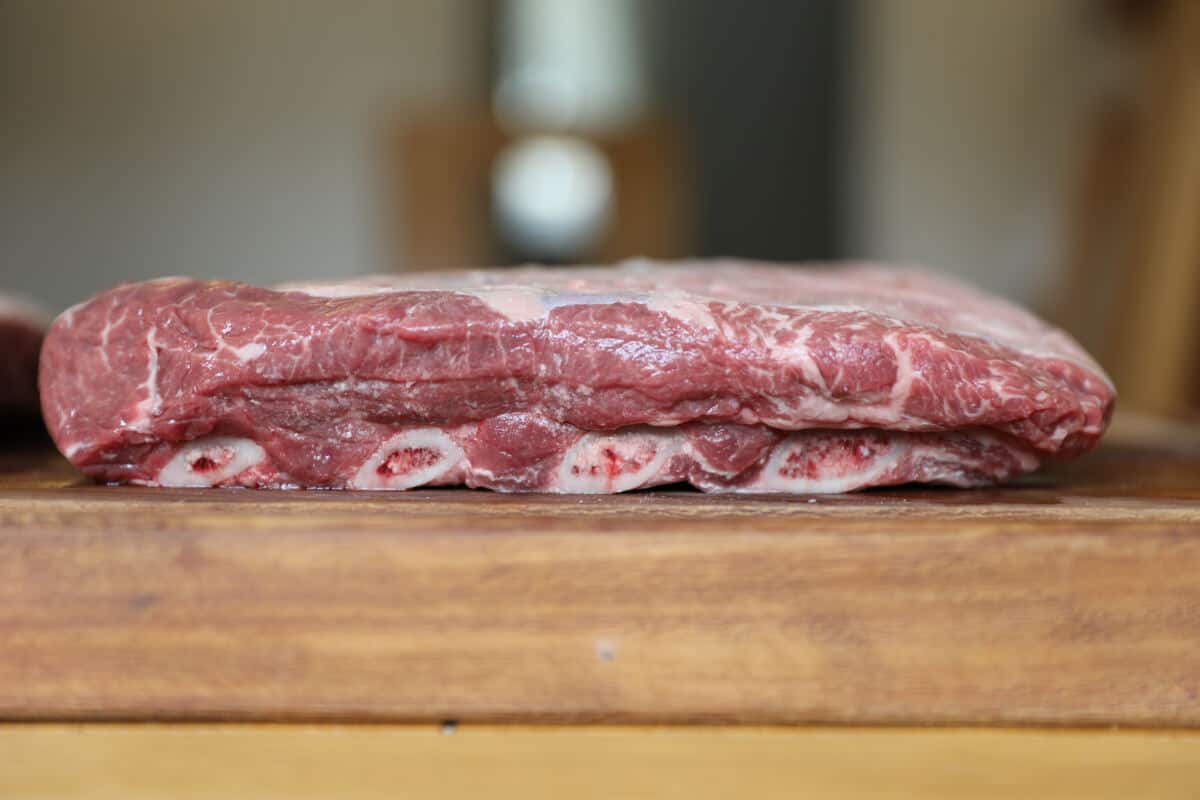
If you're looking to follow my cook, where I wrap with a liquid for part of the cook, you can buy any ribs USDA choice or better. If you plan to cook them straight through without wrapping, I recommend only USDA prime or better, or meat with similar levels of marbling.
For this cook, I used two plates of USDA prime chuck short ribs, with four ribs to each cut.
Preparing Your Smoker
You want to set up your smoker for indirect smoking, temperature 225 °F to 250 °F, and because the whole cook will take a good 8 to 10 hours, you want to have a good amount of fuel in there to last the duration.
For smoking wood, I use 3 good chunks, with my preferred being oak, hickory or beech. I sometimes add a chunk of cherry for extra color to the bark but didn't for this cook.
Of course, you can use whatever wood you prefer, but do go with a good, strong tasting wood smoke as beef can take it and even deserves it, a fruit wood is too mild. For this cook, I used oak.
Preparing the Ribs
First, how is the fat cap?
Short ribs often come with a layer of fat on top. In my experience, this is often only a couple of millimeters thick, and I leave it on. You can remove it if you wish, but nearly all of it will render out anyway and this layer of fat is added flavor!
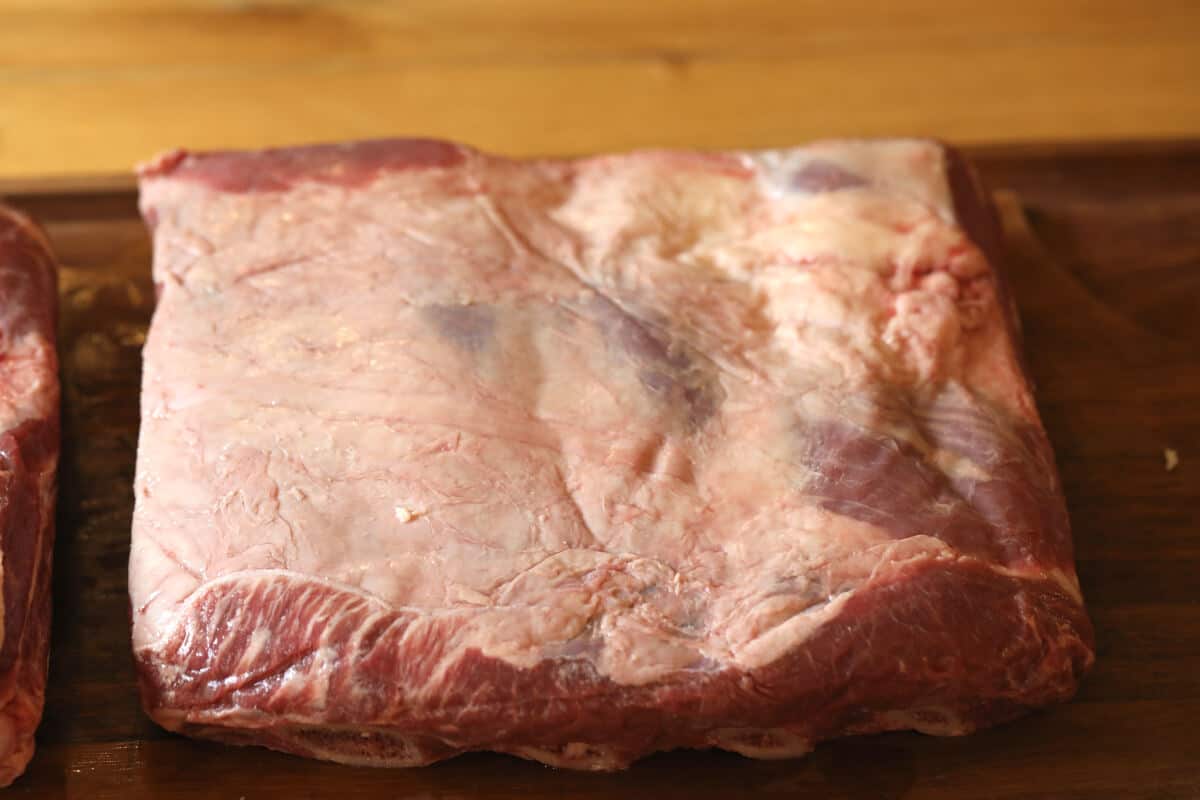
However, sometimes beef ribs will have a much thicker cap comprised of fat, meat, and silverskin that MUST be removed because the silverskin will not render down during cooking.
This extra layer of meat is either (commonly believed to be) a piece of brisket — OR — it is the muscle that forms the 'cap' on a fore rib of beef. I'm not 100% sure which it is, but either way it cooks differently to the rib meat and stated, it must be removed, along with the silverskin between this meat and the rib meat.
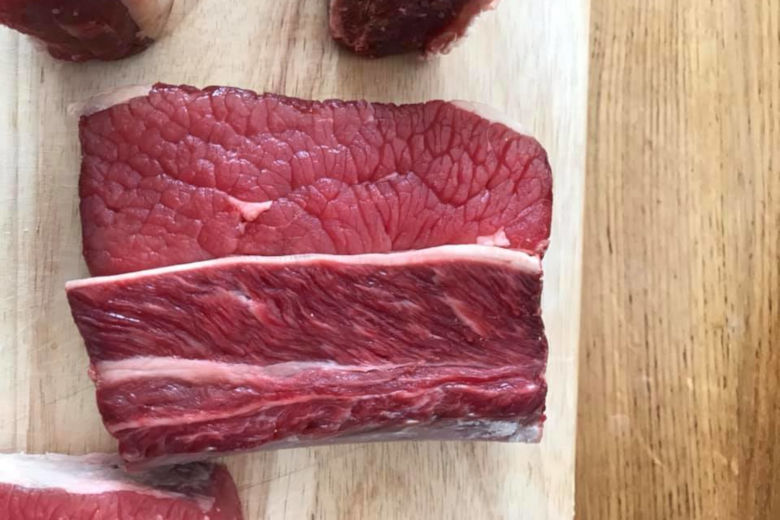
To check for this layer, look at your ribs from the side. If they are comprised of:
- Bone, thick meat, thin layer of fat — Then you are good to go.
- Bone, thick meat, thin layer of fat, second layer of meat, second layer of fat (as seen in the image above) — Then you need to remove the fat cap and extra layer of meat.
When removing the fat cap in the second example, you must remove the topmost layer of fat and the top layer of meat between the two fat layers, which includes the inedible layer of silverskin. It's just really not nice to try to chew on.
Remove the Membrane — or Not?
On the bone side of the ribs is a membrane, and I like to remove this.
This membrane is a thick, tough layer of connective tissue that remains very tough and chewy even after the meat is thoroughly cooked.
Many people do leave the membrane on, which is absolutely fine. It can be useful in that it helps prevent the meat from falling off the bone after cooking, and can simply be left — or eaten — from the finished product.
If you don't want to mess about removing membrane from ribs, a good trick is to score it in a crisscross pattern, so some rub flavor gets through, and it shrinking during cooking doesn't cause the rib meat to contract as much, curl up and disfigure.
I Remove the Membrane — Here's How
Personally, I always remove the membrane. To do so, insert the end of a blunt knife into the area above one of the end ribs and lift the membrane, as seen in the image below:
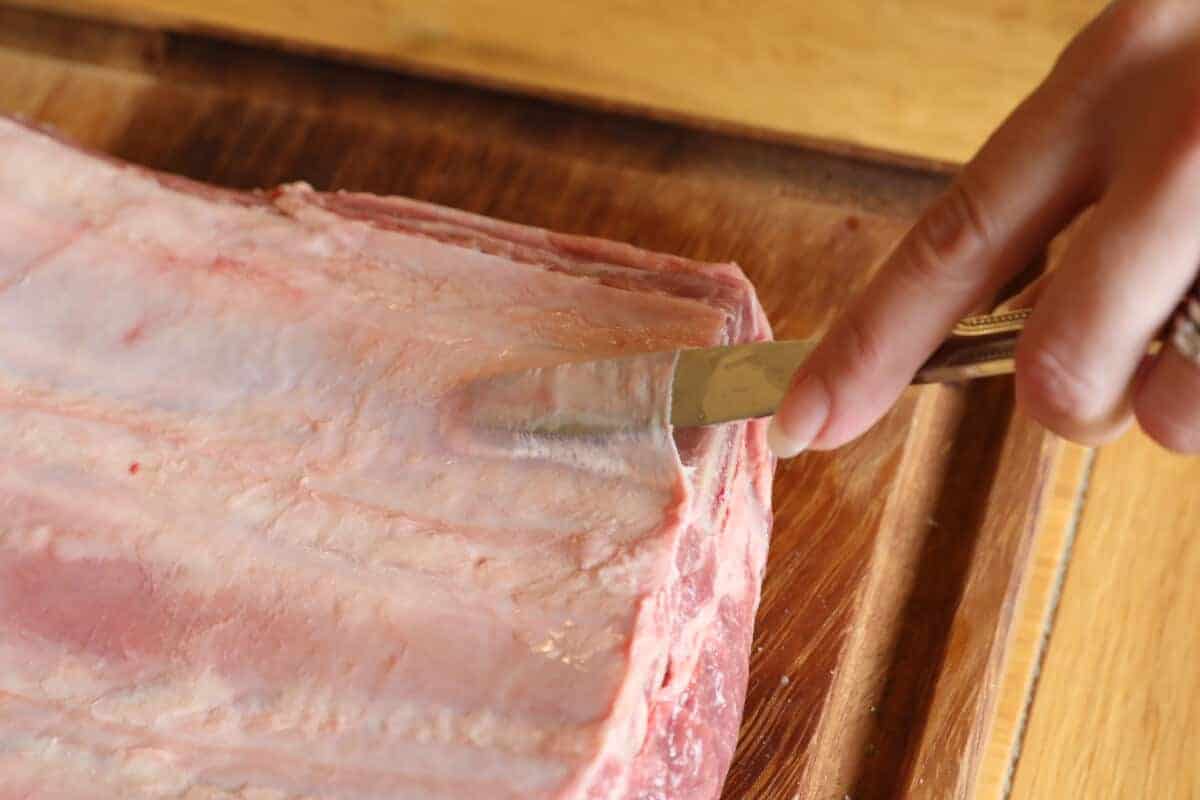
Once you can get your finger in, remove the knife and use your finger to work the membrane loose until you have a loose corner, and you are able to grab it.
You can now simply pull the membrane right off.
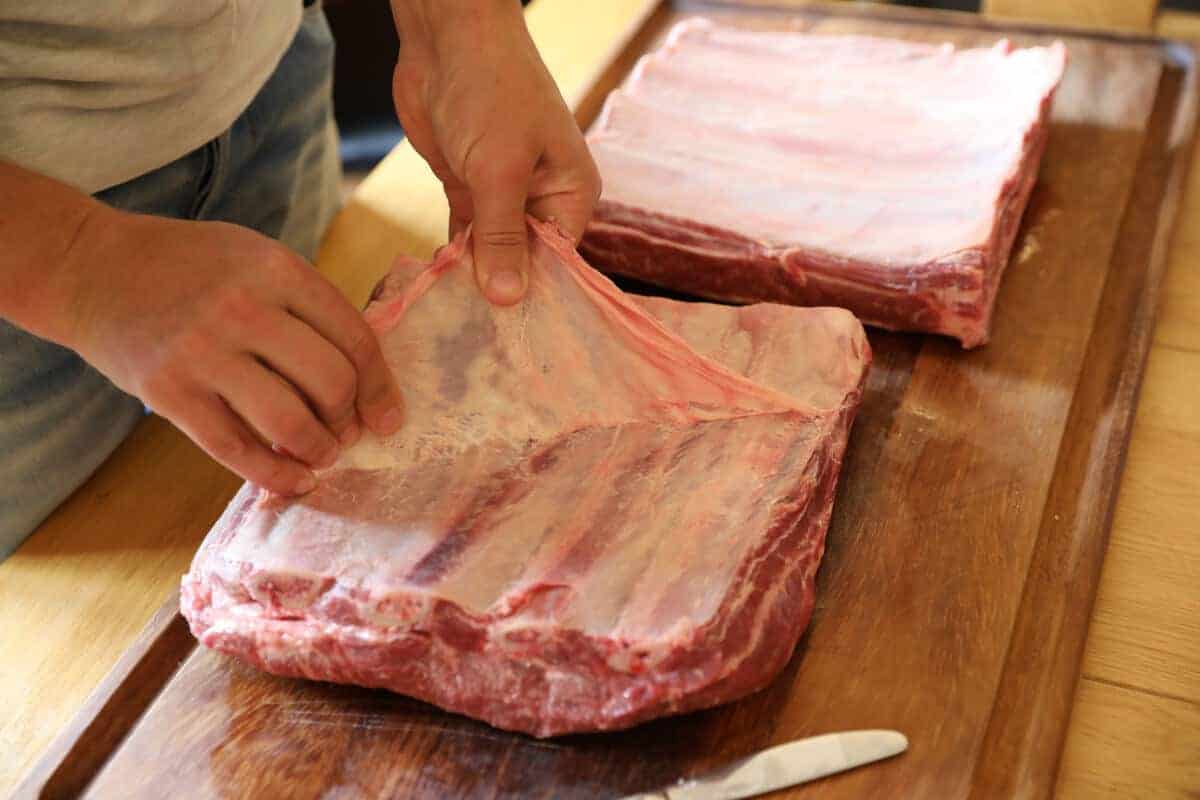
If you find your fingers slip while trying to pull it off, use some kitchen paper between your thumb and fingers which will provide the grip necessary.
The membrane on beef ribs is tough, it rarely if ever rips, so you should be able to pull it off all in one go. However, if it does rip, work another part free and try again.
Like most things, with practice, you'll become better and begin to find it easy.
Making the Rub
For this cook, I've gone with a slightly modified Texas rub: heavy on pepper and salt, with just a couple extra things thrown in.
I've cooked beef ribs many, many times, and tried all sorts of commercial rubs and making my own. The following is one I keep coming back to.
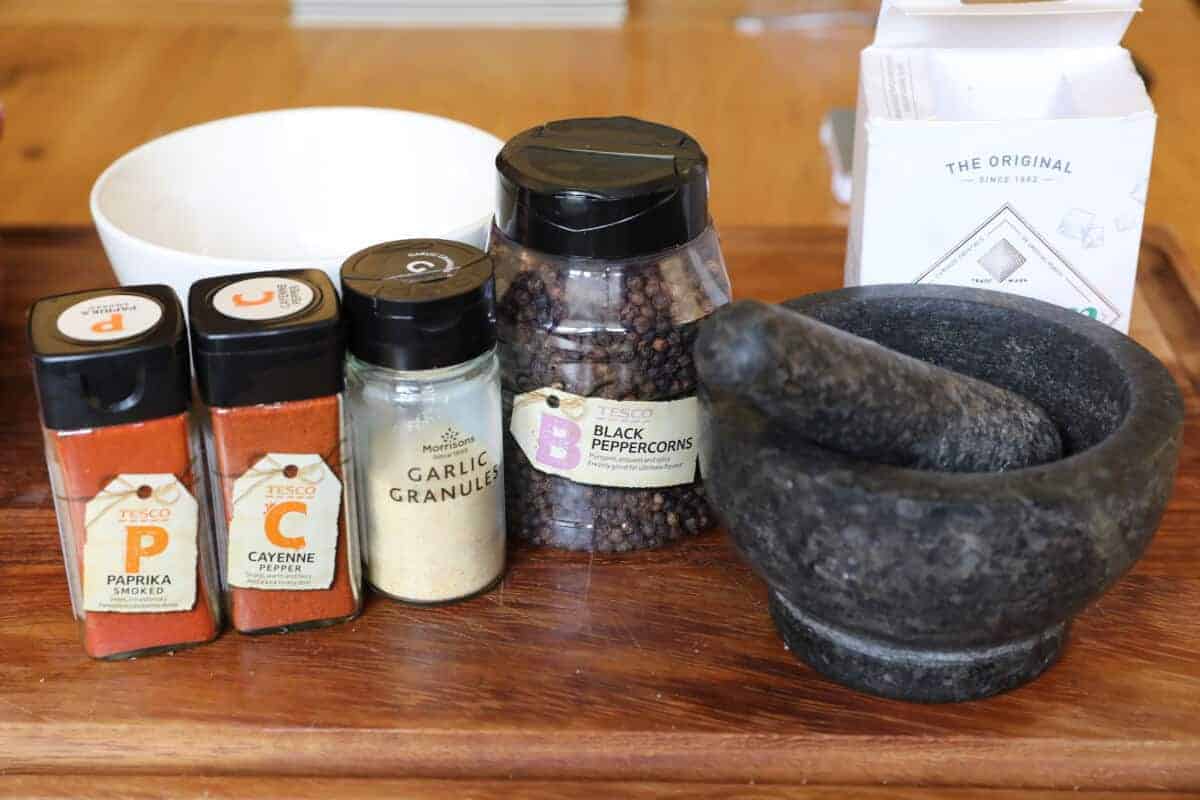
60g black peppercorns, 20g of kosher salt (or another large crystal salt), one tablespoon of Garlic Powder, one tablespoon of smoked paprika, one teaspoon cayenne pepper (optional — if you like a little heat.)
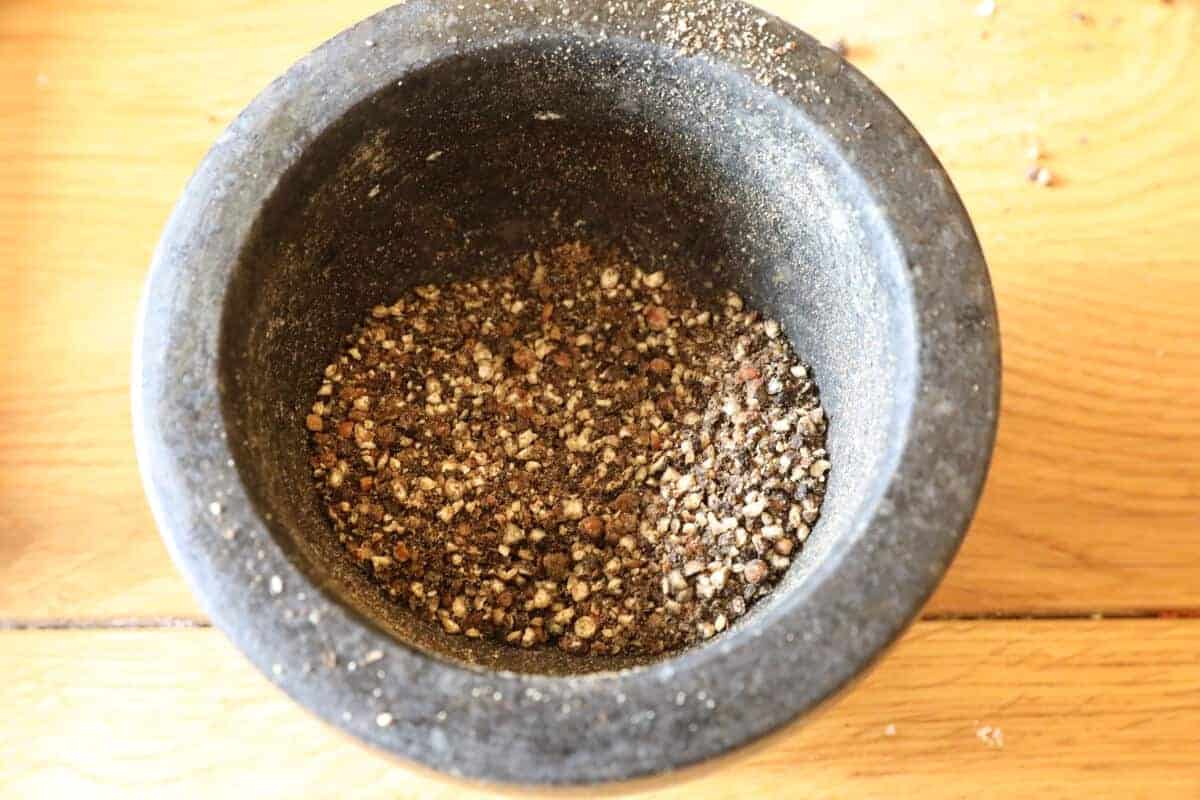
Put your peppercorns into a pestle and mortar and grind away until the pepper is still relatively coarse. Then add the other ingredients, a few more grinds to mix thoroughly, and you're done.
Coat the Ribs in Mustard
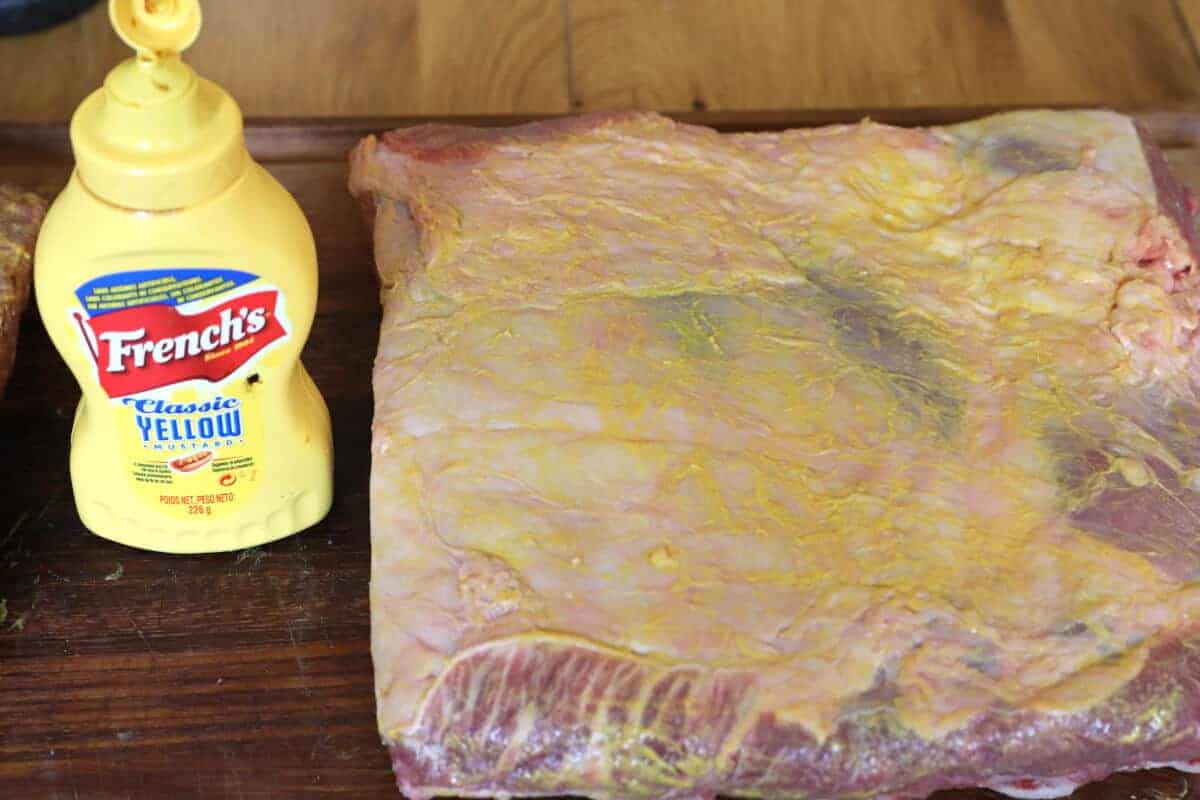
In order to help the rub stick, I like to cover the ribs in a thin layer of mustard, as can be seen in the picture below.
The mustard doesn't really add much in the way of flavor, it's just there as a binder to help the rub stick. You could also use a thin layer of oil if you prefer.
Apply Dry Rub
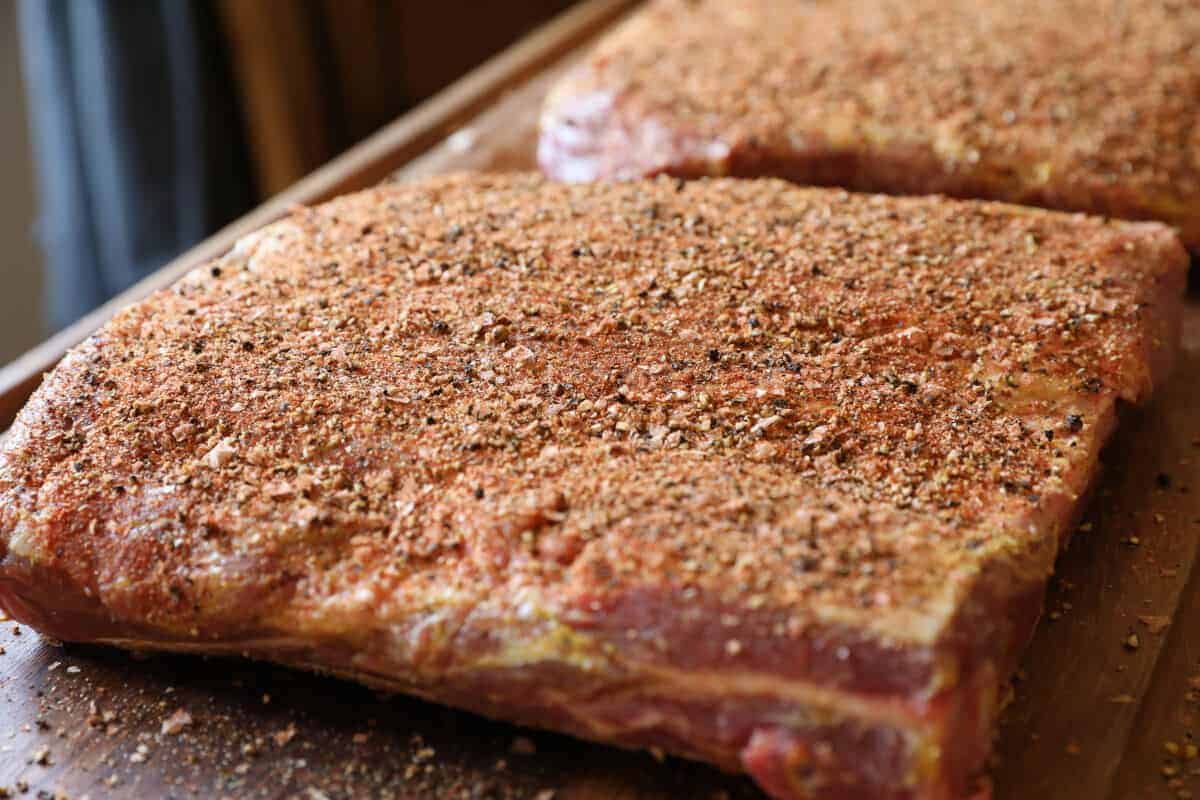
Add copious amounts of rub, but not so much that you completely cover the meat. You want to be able to just about see the meat through the rub in places.
The first time you do this, it may seem like an excessive amount, but after the amount of cooking the ribs will go through, the pepper in the rub appears to 'soften' somewhat, and the rub combines with the outer surface of the ribs to create an incredibly spicy, smoky bark, this being something we really do want to encourage.
So apply the rub liberally. In the below image, you can see as a guide roughly how much I use.
Add Your Ribs to The Smoker
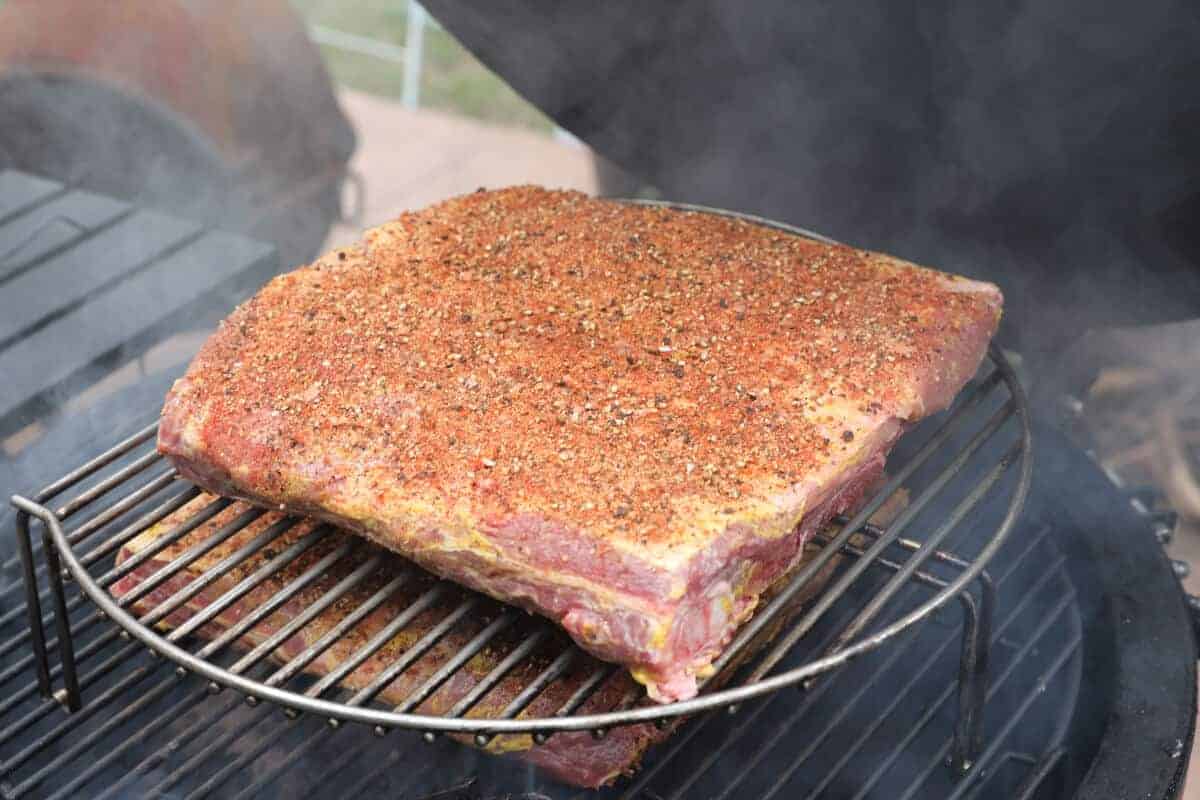
Put the ribs 'rib side down' directly onto the grates in your smoker, that's preheated to and holding a steady temp between 225 °F to 250 °F.
Place a remote digital smoker thermometer temperature probe into the ribs, making sure it's into one of the thickest parts and not touching bone.
Smoke for 4 Hours, Then Wrap With Liquid
For the first few hours of the cook, we want the ribs to take on a smoky flavor and the bark to develop. I find 4 hours is the sweet spot for this. Any less than 4 hours and the bark will not be good enough.
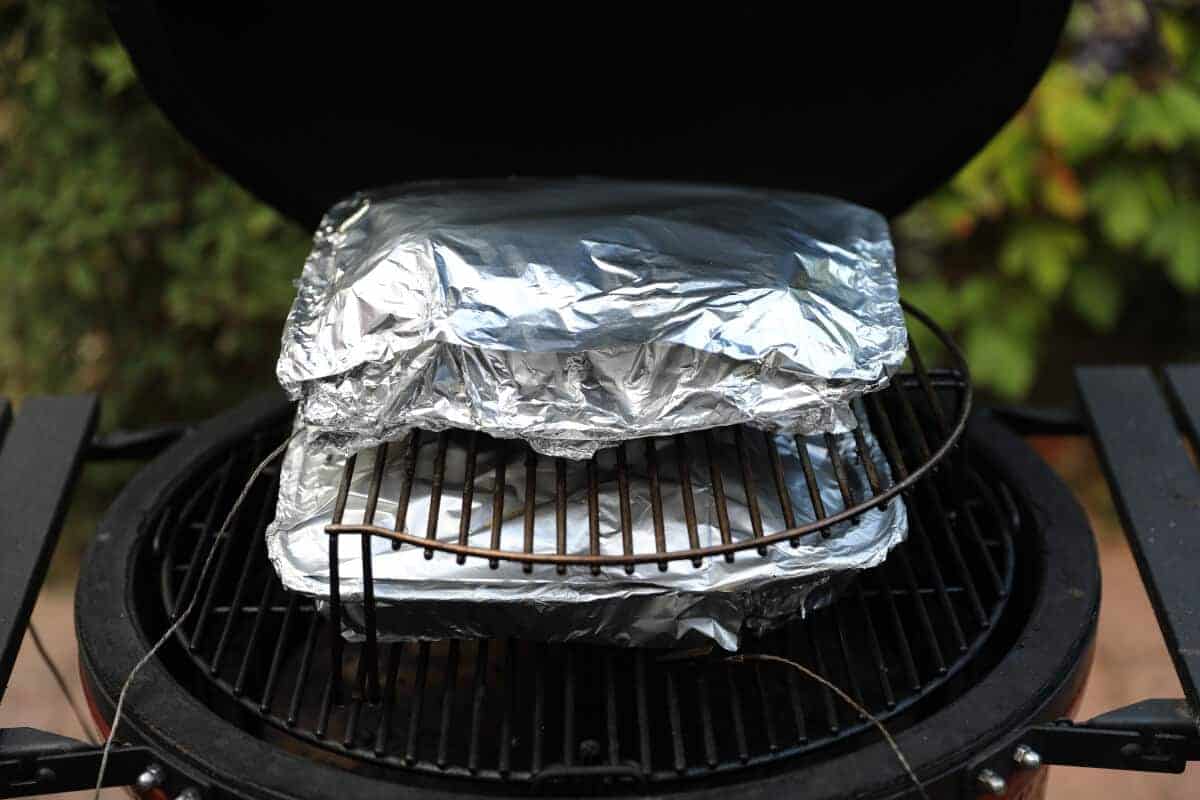
So yes, cook for 4 hours, and then I wrap. Many people do not wrap their beef ribs at all. In fact, I would say most people don't? However, I do as I will explain below.
I've done it both ways, both wrapped part way through and left unwrapped for the entirety of the cook, and both ways get good but slightly different results.
If you want a slightly drier rib, with a more pronounced and deep, chewy bark, then leave the ribs uncovered for the duration. If you like a more moist and tender rib, with less 'bite' and more fall off the bone, then wrap part way through the cook.
Wrap or Not? How to Decide? It Depends on Marbling
Another factor to consider if deciding to wrap or not, is the quality or grade of meat you have, particularly the amount of marbling in the ribs you are cooking.
If you have USDA choice or lower quality, I would recommend wrapping them. There isn't as much fat in them, and they can dry out if left unwrapped.
If you have USDA Prime or better, with tons of marbling and intramuscular fat, then there's no need to wrap, but you can if you wish.
In my house, we prefer to wrap them. They tend to be much more tender and moist when you wrap them with some braising liquid, which is how my wife and kids tend to prefer them, so that's the way I go.
I also find that regardless of the ribs I'm cooking, whether beef ribs or pork ribs, when wrapping the results are more predictable as the tenderness of the finished product and how moist it remains is less dependent on the meat quality and amount of marbling.
So, for this cook, I put them on the smoker for approx 4 hours to smoke, before placing the ribs into silver trays with a couple of glugs of beer, and sealed the trays with aluminum foil. I still left the temp probe in one of the racks to remotely monitor temps.
Cook To Tenderness, Not temp
Leave the ribs cooking until they hit 200 °F in the thickest part, as shown by the remote temperature probe, then start to probe for tenderness.
Note that not all ribs are the same and will be done at the same temp!
Some can be ready at 203f, while some may need to go as high as 210 °F, depending on the makeup of the muscle, fat and connective tissues of the animal the ribs came from.
The best way to check is they should be soft to the touch, have a little wobble, and 'probe like butter' if stuck with a toothpick, skewer or instant-read thermometer probe.
You Might Also be Interested in
When Done, Remove, Wrap and Rest
When the ribs are cooked to the correct tenderness, remove them from the smoker, unwrap and remove from the tray with the braising liquid. Then wrap them again in either pink butcher paper or tin foil, and place into a cooler to rest for at least half an hour, with an hour being preferable.
Slice Into Individual Ribs and Serve
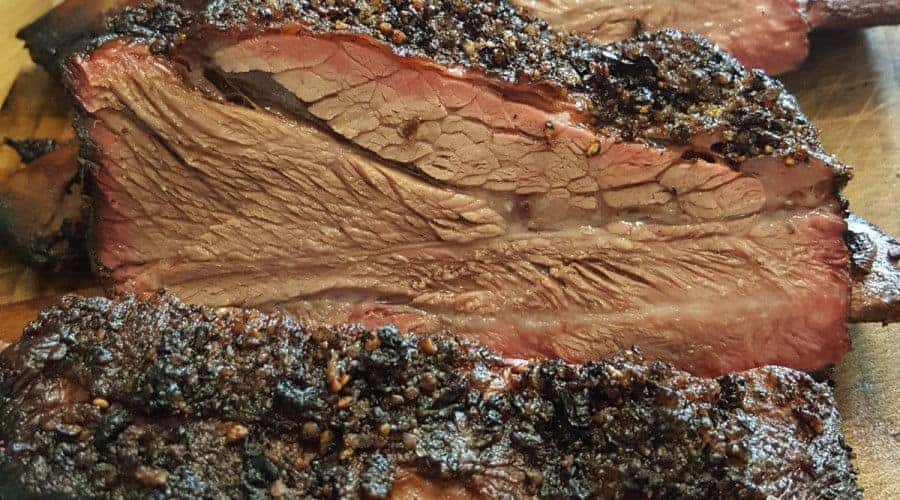
After they are rested, unwrap and slice into individual ribs to serve while still on the bone.
One rib per person with sides is a good-sized portion, and serving with pickles and some bread is a good combination. The pickles cut through the fattiness and richness of the ribs, and the bread provides some sustenance.
I like to serve with pickled red cabbage, and maybe a sweet slaw, along with good artisan bread, or perhaps some chunky chips.
Add Sauce if You Wish
You can add sauce if you like, return the ribs to the smoker for 10 minutes for the sauce to set and then serve. However, I prefer not to sauce them and provide a good sauce with some chili heat that people can help themselves to if they desire.
If you do decide to sauce them, something with a bit of heat goes very well, whereas a sweet sauce can be sickly on top of the richness and fattiness of beef ribs, so please don't go too sweet with your choice of sauce.
Printable Recipe Card
PrintDescription
Deliciously melt in the mouth, moist, tender, low n slow smoked beef short ribs Texas style, with a pepper, salt, garlic, paprika and cayenne pepper dry rub mix, for a crispy bark and moist and tender beefy interior.
- Two plates of 4 x short ribs each
- 2 tbsp French's yellow mustard
- 60g black peppercorns
- 20g kosher salt or sea salt
- Tbsp garlic powder
- Tbsp smoked paprika
- Tsp cayenne pepper (optional)
- 100ml dark beer
- Set up smoker for indirect smoking, 225f to 250f, with enough fuel to last 10 hours and add 3 chunks of strong smoking wood: Oak, hickory or beech.
- Remove the fat cap and silverskin from the top of the ribs if present, leave a thin layer of fat if possible.
- Remove the membrane from the back of the ribs. This is my personal preference, but you can leave it on if you wish.
- Put peppercorns into a pestle and mortar and grind until still coarse. Add the salt, paprika, garlic powder and cayenne pepper, grind some more and mix fully.
- Coat the ribs in a thin layer of French's yellow mustard.
- Apply dry rub evenly all over, just enough so that's it thick but so you can still see the meat beneath in places.
- Add the ribs directly onto the grates in your smoker, bone side down, with a temperature probe inserted into the thickest part to monitor temps. Smoke for 4 hours.
- After 4 hours smoking, remove the ribs, place them into an aluminum tray with 100ml of dark beer, and seal the tray with some aluminum foil. Leave the temperature probe in, so you can still monitor temps without having to unwrap.
- Cook until 200f internal temperature, then start to check for 'feel and tenderness.' Cook until the meat is soft, the meat has a wobble, and when you insert a toothpick, skewer or an instant-read thermometer probe, it 'probes like butter.'
- Remove from the smoker, remove from the foil tray, wrap in new foil and then place in a cooler to keep it warm while it rests for a minimum 45 minutes, with 1 hour being ideal.
- After the rest, slice the rack of ribs into individual ribs to serve, and serve with some red pickled cabbage, a sweet slaw, a spicy BBQ sauce that has some heat, and some artisan bread or chunky chips.
Notes
You don't have to wrap them, and many people prefer not to. If you do not wrap, you will have slightly drier ribs, but a much better crispy bark. Not wrapping is fine and you still get an incredible result for USDA prime standard, or ribs that are equally or even more marbled. For USDA choice, similar marbling or less, I would recommend to always wrap, or they can be a bit dry.
Cook to tenderness and feel, not temp. Go to 200f and then start probing, it should 'probe like butter' between the bones. This may not be until anything from 200f to 210f, and differs from ribs to ribs.
I'm afraid it's impossible to predict the cooking time accurately, because all animals are different and the ribs from them are different, and we are cooking to temp and 'doneness', not a time. Plan for between 7 and 10 hours to cook beef ribs. I like to aim for 8.5 hours, so if they cook early I can wrap them and keep them warm in a heated cooler (a faux Cambro.) If they take 10 hours, then guests only have to wait 90 minutes, and we can drink and chat.
- Prep Time: 30 minutes
- Cook Time: 8 hours 30 minutes
- Category: Main
- Method: BBQ Smoking
- Cuisine: Texan
Keywords: Smoked beef short ribs, smoked beef ribs, beef ribs, short plate ribs, BBQ beef ribs
Source: https://www.foodfirefriends.com/smoked-beef-ribs-recipe/
0 Response to "Beef Short Ribs Recipe Brisket Style"
Post a Comment